Website is built on WordPress, with a Hello Elementor theme and Elementor PRO visual builder. There is a login option for Administrators and Guests. Administrators are adding new guests manually. Guests receive an email a guest registration link and temporary password to access guest registration page. Guests need to fill in their information and will get an email for activation of their account. After this process they can access Property’s Need-to-Know page and SOS Call.
Homepage Layout is blog-centric, and most of it is dynamic post content, using Elementor Loops.
Blog posts have Single Post template, and all styles are applied automatically. New posts are created by Administrators by using simple top bar or using more advanced WordPress dashboard.
Login process is the same for administrators and guests, the only difference is in shown information and editing capabilities.
To add a new post simply Click on +Add New Post
Always save your work! WordPress does not auto-save!
Post Title is the actual post name, and it will be displayed as the H1 on your Post Template. Also, it will generate URL slug based on that Post Title.
Example:
Post Title: My New Blog Post
Post Template H1: My New Blog Post
Post URL: www.coucou-christine/my-new-blog-post
You can save your post by clicking on Save as Draft and your Post is not going to be displayed to your visitors.
After you Publish, you can Switch to Draft which will take your post to Draft and it will no longer be visible to your visitors.

Publish will publish your Post to the public, or update it if it is already published.
Opens Settings panel on the right side
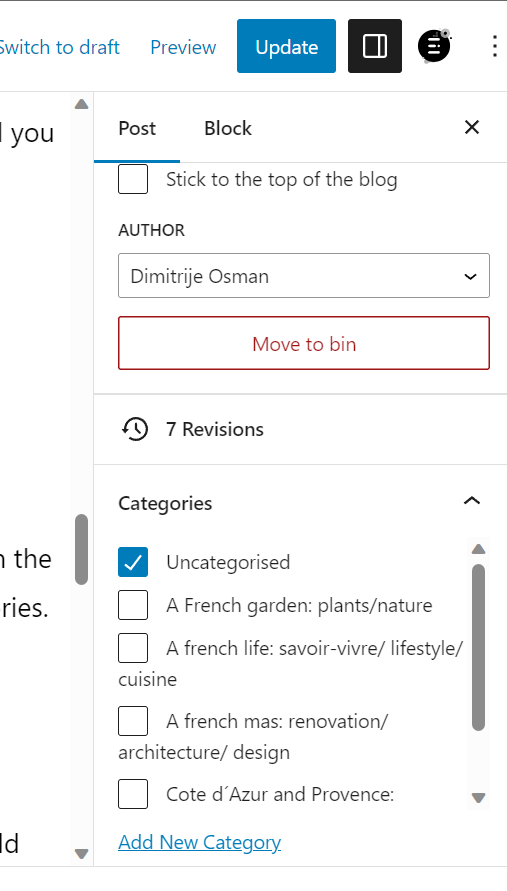
It has 2 TABS, Post and Block
By default every new post is Unassigned.
You can check the box in front of the Category you want to use. You can use multiple Categories.
TIP: Uncheck Unnasigned after you have selected your category.
Below the Category section, there is a Tag section and you can add tags to your posts as well. Currently, they are not being used on your layout, but in the future, we will.
Below Categories and Tags, there is a Featured Image section. The featured image is the main image of your post, and it is being displayed everywhere in your layout. Always add a featured image to your posts, otherwise, layout will be empty.

To open the panel on the left side click on the + icon in the top-left corner.
Just below the search there are 4 TABS, Blocks, Patterns, Media and the last one has only icon. The name of it is Reusable Blocks and I have saved all of your layout blocks there. You simply drag and drop the block you want on the page. They are PURPLE in color. After you drag block, their borders is PURPLE AS WELL. You need to Convert it to a regular block BEFORE THE EDITING by pressing on the icon on the right.
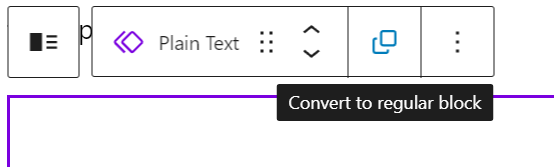
After that block border will stop being PURPLE and you can add your content in.
Workflow: